

Setting up a Kubernetes homelab is one of those projects that sounds straightforward until you’re manually installing Ubuntu for the fifth time. I run k3s, a lightweight Kubernetes distribution that suits homelabs, on Proxmox VE, and the single best decision I made early on was building a cloud-init template. Clone it, inject credentials, boot – done in under a minute. This post walks through exactly how I did it.
The Problem With Manual Installs #
Every time I needed a new node for my k3s cluster, I’d go through the same ritual: boot an Ubuntu ISO, click through the installer, set a hostname, configure a user, paste in my SSH key, wait ten minutes. Multiply that by the number of control-plane and worker nodes I planned to run, and it gets tedious fast.
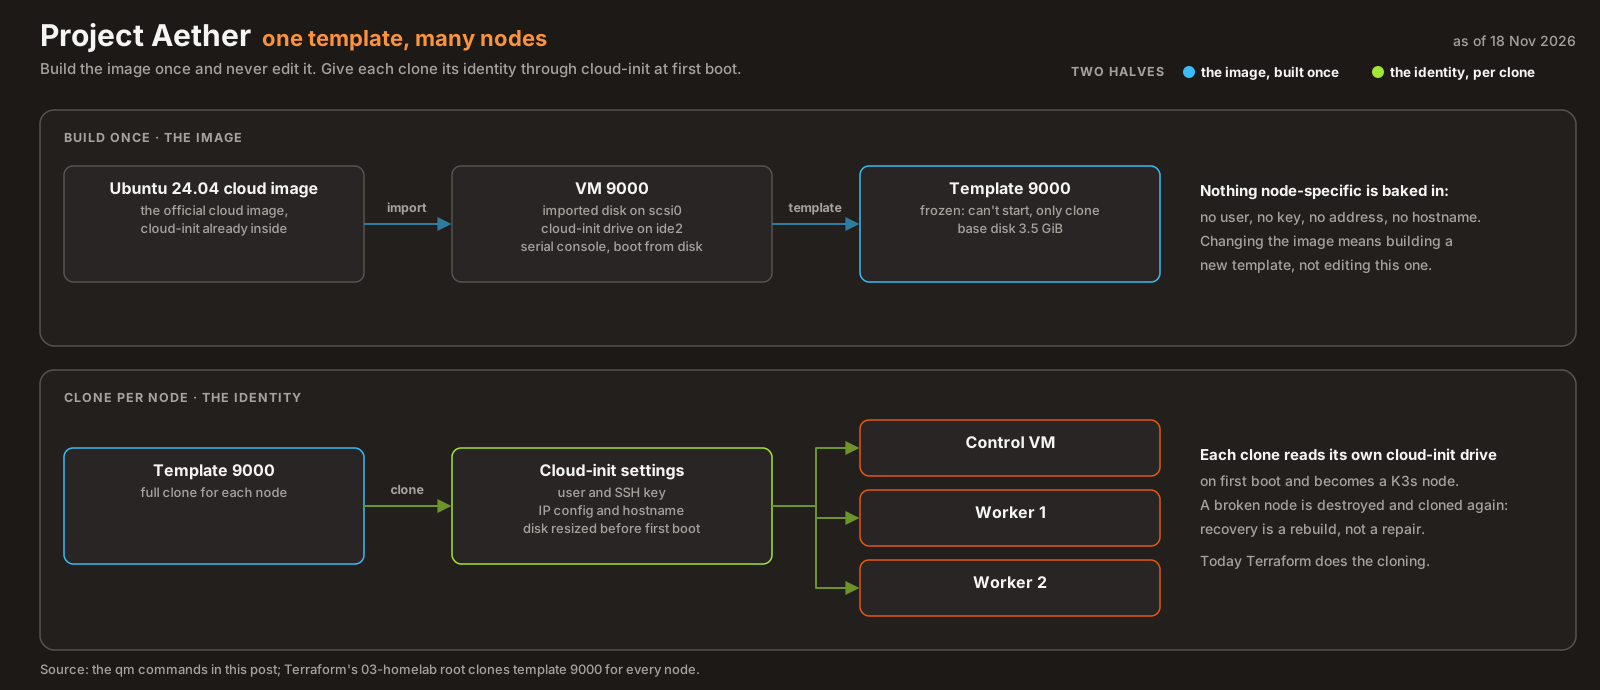
The solution is the same one cloud providers have been using for years: a golden base image + cloud-init. You build the image once, freeze it as a Proxmox template, and every future VM is a clone that gets its unique configuration – hostname, SSH key, IP address – injected automatically at first boot.
What Is Cloud-Init? #
Cloud-Init is the industry-standard mechanism for bootstrapping cloud and virtual machine instances. On first boot, the cloud-init service inside the OS:
- Detects a configuration source (in Proxmox’s case, a tiny virtual CD-ROM drive)
- Reads the configuration: users, SSH keys, network settings, hostname
- Applies everything to the running system
- Marks itself as done and never runs again on subsequent boots
Ubuntu’s official cloud images ship with cloud-init pre-installed. These are minimal, pre-installed disk images (not ISO installers) designed for this workflow.
Prerequisites #
Before starting, I made sure I had:
- Proxmox VE installed and reachable on my network
- A storage pool:
local-lvm(the default thin-provisioned LVM pool on most Proxmox installs) - The default network bridge:
vmbr0 - Internet access from the Proxmox host (to download the Ubuntu image)
Step 1: Download the Ubuntu 24.04 Cloud Image #
wget https://cloud-images.ubuntu.com/noble/current/noble-server-cloudimg-amd64.imgUbuntu publishes dedicated cloud images, and they’re very different from ISO installers:
| Cloud Image | ISO Installer | |
|---|---|---|
| Format | .img (qcow2 internally) |
.iso bootable installer |
| Size | ~600 MB | ~1.5 GB |
| Installation required | No, already installed | Yes, interactive or preseed |
| Cloud-Init support | Built-in | Requires manual setup |
The file is sparse: ~600 MB on disk but represents a 3.5 GiB virtual disk. The name “Noble” is Ubuntu’s codename for 24.04 LTS; the current/ path always points to the latest build of that release.
DNS Gotcha on a Fresh Proxmox Host #
I ran into a subtle issue here. My Proxmox host already had Tailscale installed, which means resolv.conf was managed by Tailscale’s MagicDNS (100.100.100.100). Public DNS resolution was failing silently. The quick fix:
echo "nameserver 8.8.8.8" > /etc/resolv.conf
wget https://cloud-images.ubuntu.com/noble/current/noble-server-cloudimg-amd64.img
# Restore resolv.conf afterwards
The permanent fix is to add a global fallback nameserver in the Tailscale admin console under DNS → Global nameservers with Override DNS servers enabled. Took me a bit to figure that one out.
Step 2: Create the VM Shell #
qm create 9000 \
  --name "ubuntu-2404-cloudinit" \
  --memory 2048 \
  --cores 2 \
  --net0 virtio,bridge=vmbr0
This creates an empty VM with ID 9000, with no disk attached yet, just the configuration skeleton. I chose ID 9000 by convention: high IDs keep templates visually separated from real VMs (which typically run from 100–899).
| Parameter | Value | Why |
|---|---|---|
9000 |
VM ID | Convention: high numbers for templates |
--memory 2048 |
2 GB RAM | Baseline; clones can override this per-node |
--cores 2 |
2 vCPUs | Baseline; clones can override |
--net0 virtio |
Network adapter | virtio is paravirtualized, so it’s faster than emulated e1000/rtl8139 because the guest cooperates directly |
bridge=vmbr0 |
Network bridge | Proxmox’s default Linux bridge; connects VMs to the physical network |
Step 3: Import the Disk #
qm importdisk 9000 noble-server-cloudimg-amd64.img local-lvmThis converts the .img file and writes it into Proxmox’s LVM storage as a logical volume named vm-9000-disk-0. The original .img file is no longer needed after this.
LVM gives Proxmox fine-grained control over disk allocation, snapshots, and cloning, all things I rely on heavily when spinning up k3s nodes. The local-lvm pool is thin-provisioned, so storage is allocated on demand rather than up front.
The import output shows ~3.5 GiB being written even though the download was only ~600 MB. That’s because qcow2 stores sparse data compressed; LVM expands it to full size.
Step 4: Attach the Disk #
qm set 9000 --scsihw virtio-scsi-pci --scsi0 local-lvm:vm-9000-disk-0This attaches the imported disk via a virtio-scsi controller:
| Part | What it does |
|---|---|
--scsihw virtio-scsi-pci |
Paravirtualized SCSI controller: better performance, supports TRIM/discard and hot-plug |
--scsi0 |
The controller slot; this disk appears as /dev/sda inside the guest |
local-lvm:vm-9000-disk-0 |
References the volume created in Step 3 |
Step 5: Attach the Cloud-Init Drive #
qm set 9000 --ide2 local-lvm:cloudinitThis creates a small virtual CD-ROM drive (vm-9000-cloudinit) and attaches it as ide2. Proxmox generates a Cloud-Init ISO (essentially a tiny disc containing the configuration data) and burns it to this virtual drive.
On first boot, the cloud-init service detects the CD-ROM, reads the configuration from it, applies it (hostname, users, SSH keys, network), and marks itself as complete. This is the mechanism that turns the generic base image into a configured, named VM – without any manual interaction.
The ide2 slot is used rather than SCSI because Cloud-Init drives are CD-ROMs, and IDE is the standard interface for optical drives in Proxmox VMs.
Step 6: Configure Boot Order #
qm set 9000 --boot c --bootdisk scsi0Tells the VM to boot from scsi0 (the Ubuntu disk). Without this, the VM might attempt a PXE boot or fail to find its boot device entirely. --boot c is the Proxmox shorthand for “boot from first hard disk.”
Step 7: Enable the Serial Console #
qm set 9000 --serial0 socket --vga serial0This one is easy to miss but critical. Ubuntu cloud images are built without a graphical framebuffer. They expect to run headless. Without a serial console:
- The Proxmox web UI console shows a black screen
- There’s no way to interact with the VM during or after boot
This command adds a serial port (serial0) and redirects VGA output to it. Proxmox then exposes this as an interactive terminal in the web UI under the Console tab (xterm.js). I learned this the hard way the first time.
Step 8: Convert to Template #
qm template 9000This freezes VM 9000 as a template. Proxmox renames the disk from vm-9000-disk-0 to base-9000-disk-0, marking it as a base image that cannot be modified directly.
A template cannot be started. It can only be cloned. This is intentional: it protects the clean base image from accidental modification. After this step, here’s the state of the template:
VM 9000 (template)
├── scsi0     → base-9000-disk-0  (3.5 GiB, Ubuntu 24.04 root disk)
├── ide2      → vm-9000-cloudinit (Cloud-Init ISO, ~1 MB)
├── net0      → virtio, vmbr0
├── serial0   → socket (console access)
└── [frozen – clone-only]
Using the Template: Spinning Up a k3s Node #
With the template ready, provisioning a new VM takes four commands:
# 1. Clone the template
qm clone 9000 <vm-id> --name <hostname> --full

# 2. Configure Cloud-Init for this specific VM
qm set <vm-id> --ciuser <user>
qm set <vm-id> --sshkeys ~/.ssh/id_ed25519.pub
qm set <vm-id> --ipconfig0 ip=dhcp   # or a static IP: ip=<address>/24,gw=<gateway>

# 3. Resize the disk (3.5 GiB base is too small for real use)
qm resize <vm-id> scsi0 +20G

# 4. Start the VM
qm start <vm-id>
First boot takes about 30 seconds as cloud-init runs. SSH is available as soon as it completes. No clicking, no waiting through an installer, no manual configuration.
What I learned #
- Read what’s managing
resolv.confbefore you debug a download. Tailscale’s MagicDNS had taken it over on the host, and the failure looked like a network problem rather than a DNS one. - Ubuntu cloud images are headless. Without
--serial0 socket --vga serial0, the Proxmox console is a black screen and you can’t tell a hung boot from a slow one. - The base disk is only 3.5 GiB. Resize every clone before first boot, or the node fills up the first time it pulls a few container images.
- A template can’t be started, only cloned. That’s what keeps the base image clean, so treat changes to it as a rebuild, not an edit.
Architecture takeaways #
Separate the image from the identity #
The template holds everything every node has in common, and cloud-init injects the few things that make one node different: hostname, user, SSH key, address. Because identity is applied at boot from configuration, a node can be thrown away and recreated without anyone remembering how it was set up. The same principle came back later in the series, when identity set by a console click turned out not to survive a container recreate.
Disposable nodes make recovery a rebuild #
When a node is a clone plus a few injected values, repairing a broken one is rarely worth it. Recreate it and let configuration management bring it back to the same state. That only works if every step after the clone is automated, which is why the next layers were Terraform and Ansible rather than more hand-run qm commands.
What came next #
This template became the foundation for the rest of Project Aether:
- Terraform now does the cloning. The
03-homelabmodule clones template9000for each node and sets its cloud-init values, run withtask tf:plan DIR=03-homelab. A second module manages the Oracle Cloud host (01-oci-compute), and both share a GCS remote state backend. - SOPS + age + GCP Cloud KMS encrypt secrets (SSH keys, API tokens, Tailscale credentials) before they touch Git. Either key can decrypt on its own: the local age key, or Cloud KMS through
gcloud auth application-default login, so there are no key files to copy between machines. - ArgoCD deploys workloads onto the cluster from Git, so nothing is applied by hand with
kubectl.
The point of building this way (template, then clone, then GitOps) is that the infrastructure becomes code. If I wipe a node and re-provision it, it comes back to the same state.